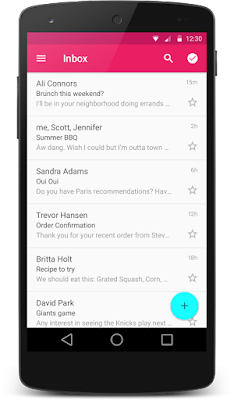
How to implement RecyclerView using RecyclerView.Adapter
The RecyclerView class supports the display of a collection of data.
RecyclerView makes it easy to efficiently display large sets of data. You
supply the data and define how each item looks, and the RecyclerView
library dynamically creates the elements when they're needed.
It is a modernized version of the ListView and the GridView classes
provided by the Android framework. RecyclerView addresses several issues
that the existing widgets have. This widget is a container for displaying
large data sets that can be scrolled very efficiently by maintaining a
limited number of views.
If you're looking to implement recycler view in Kotlin, check out our latest article: RecyclerView with ItemClickListener in Kotlin
What is RecyclerView
The RecyclerView class simplifies the display and handling of large data
sets by providing:
- Layout managers for positioning items
- Default animations for common item operations, such as the removal or addition of items
Recycler view uses a ViewHolder to store references to the views for one
entry in the recycler view. A ViewHolder class is a static inner class in
your adapter which holds references to the relevant views. With these
references, your code can avoid the time-consuming findViewById() method to
update the widgets with new data.
If you want to use a RecyclerView, you will need to work with the
following:
- RecyclerView.Adapter - To handle the data collection and bind it to the view
- LayoutManager - Helps in positioning the items
- ItemAnimator - Helps with animating the items for common operations such as the Addition or Removal of item
How to implement RecyclerView
Make sure the RecyclerView support library is listed as a dependency in
your
app/build.gradle:dependencies {
...
compile 'com.android.support:support-v4:24.2.1'
compile 'com.android.support:recyclerview-v7:24.2.1'
}
Defining a Model
Every RecyclerView is backed by a source for data. In this case, we will
define a Contact class which represents the data model being displayed by
the RecyclerView:
public class Contact {
    private String mName;
    private boolean mOnline;

    public Contact(String name, boolean online) {
        mName = name;
        mOnline = online;
    }

    public String getName() {
        return mName;
    }

    public boolean isOnline() {
        return mOnline;
    }

    private static int lastContactId = 0;

    public static ArrayList<Contact> createContactsList(int numContacts) {
        ArrayList<Contact> contacts = new ArrayList<Contact>();

        for (int i = 1; i <= numContacts; i++) {
            contacts.add(new Contact("Person " + ++lastContactId, i <= numContacts / 2));
        }

        return contacts;
    }
}
Create the RecyclerView within Layout
Inside the desired activity layout XML file i.e.
res/layout/activity_users.xml, let's add the RecyclerView from
the support library:
<RelativeLayout xmlns:android="http://schemas.android.com/apk/res/android"
    android:layout_width="match_parent"
    android:layout_height="match_parent" >

    <android.support.v7.widget.RecyclerView
      android:id="@+id/rvContacts"
      android:layout_width="match_parent"
      android:layout_height="match_parent" />

</RelativeLayout>
Creating the Custom Row Layout
This layout file can be created in
res/layout/item_contact.xml and will be rendered for each item
row.
<?xml version="1.0" encoding="utf-8"?>
<LinearLayout
        xmlns:android="http://schemas.android.com/apk/res/android"
        android:orientation="horizontal"
        android:layout_width="match_parent"
        android:layout_height="wrap_content"
        android:paddingTop="10dp"
        android:paddingBottom="10dp"
        >

    <TextView
        android:id="@+id/contact_name"
        android:layout_width="0dp"
        android:layout_height="wrap_content"
        android:layout_weight="1"
        />

    <Button
        android:id="@+id/message_button"
        android:layout_width="wrap_content"
        android:layout_height="wrap_content"
        android:paddingLeft="16dp"
        android:paddingRight="16dp"
        android:textSize="10sp"
        />
</LinearLayout>
Creating the RecyclerView Adapter
An adapter manages the data model and adapts it to the individual entries in
the widget. It extends the
RecyclerView.Adapter class and is
assigned to the recycler view via the
recyclerView.setAdapter() method. The input to the adapter of
a recycler view can be any arbitrary Java object. Based on this input the
adapter must return the total number of items via its
getItemCount() method. row.
Every adapter has three primary methods:
onCreateViewHolder()- to inflate the item layout and create the holder.onBindViewHolder()- to set the view attributes based on the data.getItemCount()- to determine the number of items.
We need to implement all three to finish the adapter:
public class ContactsAdapter extends
    RecyclerView.Adapter<ContactsAdapter.ViewHolder> {

    // ... constructor and member variables

    // Usually involves inflating a layout from XML and returning the holder
    @Override
    public ContactsAdapter.ViewHolder onCreateViewHolder(ViewGroup parent, int viewType) {
        Context context = parent.getContext();
        LayoutInflater inflater = LayoutInflater.from(context);

        // Inflate the custom layout
        View contactView = inflater.inflate(R.layout.item_contact, parent, false);

        // Return a new holder instance
        ViewHolder viewHolder = new ViewHolder(contactView);
        return viewHolder;
    }

    // Involves populating data into the item through holder
    @Override
    public void onBindViewHolder(ContactsAdapter.ViewHolder viewHolder, int position) {
        // Get the data model based on position
        Contact contact = mContacts.get(position);

        // Set item views based on your views and data model
        TextView textView = viewHolder.nameTextView;
        textView.setText(contact.getName());
        Button button = viewHolder.messageButton;
        button.setText("Message");
    }

    // Returns the total count of items in the list
    @Override
    public int getItemCount() {
        return mContacts.size();
    }
}
Binding the Adapter to the RecyclerView
In our activity, we will populate a set of sample users which should be
displayed in the RecyclerView.
public class UserListActivity extends AppCompatActivity {

     ArrayList<Contact> contacts;

     @Override
     protected void onCreate(Bundle savedInstanceState) {
         // ...
         // Lookup the recyclerview in activity layout
         RecyclerView rvContacts = (RecyclerView) findViewById(R.id.rvContacts);

         // Initialize contacts
         contacts = Contact.createContactsList(20);
         // Create adapter passing in the sample user data
         ContactsAdapter adapter = new ContactsAdapter(this, contacts);
         // Attach the adapter to the recyclerview to populate items
         rvContacts.setAdapter(adapter);
         // Set layout manager to position the items
         rvContacts.setLayoutManager(new LinearLayoutManager(this));
         // That's all!
     }
}


