
In Step 3 you learned that an Activity is one screen. But what happens when you want multiple sections on the same screen — a list on the left, details on the right on a tablet? Or a bottom navigation bar that switches between sections without destroying and recreating the whole screen? That's where Fragments come in.
A Fragment is a reusable piece of UI that lives inside an Activity. Think of it as a sub-screen — it has its own layout, its own lifecycle, and its own logic. This step covers the Fragment lifecycle, how to create and display Fragments with ViewBinding, how to navigate between them using the Navigation Component, and the memory leak trap that every beginner hits.

Fragments — reusable UI components hosted inside an Activity
1. What Is a Fragment?
A Fragment is always hosted inside an Activity — it cannot exist on its own. The Activity provides the container; the Fragment provides the content inside it.
| Activity | Fragment | |
|---|---|---|
| Lives | Independently | Inside an Activity |
| Navigation | Via Intents | Via Navigation Component or FragmentManager |
| Reusable | Not easily | Yes — same Fragment in multiple Activities |
| Back stack | System manages | FragmentManager or NavController manages |
2. The Fragment Lifecycle
The Fragment lifecycle is more complex than the Activity lifecycle because a Fragment has two separate lifecycles — the Fragment itself and its View. This is the source of the most common Fragment memory leak.

Fragment Lifecycle diagram — showing all lifecycle callbacks from onAttach() to onDetach() and the separate view lifecycle from onCreateView() to onDestroyView()
| Method | When called | What to do here |
|---|---|---|
onAttach() |
Fragment attached to Activity | Get Activity context |
onCreate() |
Fragment created | Initialise non-UI data, arguments |
onCreateView() |
Fragment creates its View | Inflate the layout, return the root view |
onViewCreated() |
View is fully created | Set click listeners, observe LiveData — main setup method |
onStart() |
Fragment visible | Start animations |
onResume() |
Fragment interactive | Resume camera, sensors |
onPause() |
Fragment losing focus | Pause animations, save state |
onStop() |
Fragment not visible | Stop heavy operations |
onDestroyView() |
View is being destroyed | Set _binding = null — prevents memory leak |
onDestroy() |
Fragment destroyed | Cancel background tasks |
onDetach() |
Detached from Activity | Final cleanup |
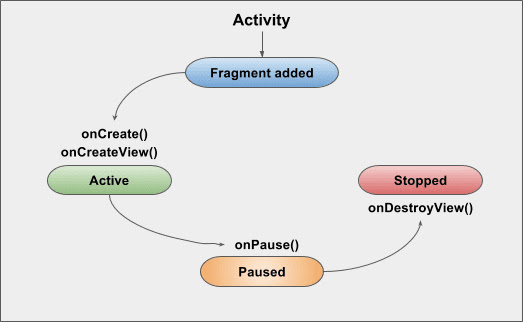
Fragment lifecycle states and their relation to the Activity lifecycle
3. Creating a Fragment with ViewBinding
The correct ViewBinding pattern for Fragments is slightly different from Activities because of the two lifecycles. The binding must be nulled out in onDestroyView() — the Fragment instance lives longer than its View:
// fragment_home.xml — simple layout
// res/layout/fragment_home.xml
package com.example.myapp

import android.os.Bundle
import android.view.LayoutInflater
import android.view.View
import android.view.ViewGroup
import androidx.fragment.app.Fragment
import com.example.myapp.databinding.FragmentHomeBinding

class HomeFragment : Fragment() {

    // _binding is nullable — must be null after view is destroyed
    private var _binding: FragmentHomeBinding? = null

    // Non-null accessor — only valid between onCreateView and onDestroyView
    private val binding get() = _binding!!

    override fun onCreateView(
        inflater: LayoutInflater,
        container: ViewGroup?,
        savedInstanceState: Bundle?
    ): View {
        _binding = FragmentHomeBinding.inflate(inflater, container, false)
        return binding.root
    }

    override fun onViewCreated(view: View, savedInstanceState: Bundle?) {
        super.onViewCreated(view, savedInstanceState)

        // Set up UI here — NOT in onCreateView
        binding.tvTitle.text = "Welcome to Home"
        binding.btnAction.setOnClickListener {
            // Handle click
        }
    }

    override fun onDestroyView() {
        super.onDestroyView()
        // CRITICAL — null the binding to prevent memory leak
        // The Fragment instance can outlive its view
        _binding = null
    }
}
_binding in onDestroyView(), the binding holds a reference to the destroyed View. The Fragment instance stays in memory (e.g. in the back stack) holding a dead View — that's a memory leak. Always _binding = null in onDestroyView().
onCreateView(). Set up click listeners, observers, and UI logic in onViewCreated(). The view is guaranteed to be non-null in onViewCreated().
4. Navigation Component — The Modern Way to Navigate
Manual FragmentManager transactions work but get complex fast — back stack management, animations, argument passing all need manual code. The Navigation Component handles all of this automatically.

Navigation Graph editor in Android Studio showing HomeFragment → DetailFragment connection
Setup
// app/build.gradle.kts
dependencies {
    val nav_version = "2.7.7"
    implementation("androidx.navigation:navigation-fragment-ktx:$nav_version")
    implementation("androidx.navigation:navigation-ui-ktx:$nav_version")
}
Create a Navigation Graph
- Right-click
res/→ New → Android Resource File - Name it
nav_graph, Resource type: Navigation - Click the + button to add your Fragment destinations
<!-- res/navigation/nav_graph.xml -->
<?xml version="1.0" encoding="utf-8"?>
<navigation xmlns:android="http://schemas.android.com/apk/res/android"
    xmlns:app="http://schemas.android.com/apk/res-auto"
    android:id="@+id/nav_graph"
    app:startDestination="@id/homeFragment">

    <fragment
        android:id="@+id/homeFragment"
        android:name="com.example.myapp.HomeFragment"
        android:label="Home">
        <action
            android:id="@+id/action_home_to_detail"
            app:destination="@id/detailFragment" />
    </fragment>

    <fragment
        android:id="@+id/detailFragment"
        android:name="com.example.myapp.DetailFragment"
        android:label="Detail">
        <argument
            android:name="itemId"
            app:argType="integer" />
    </fragment>

</navigation>
Add NavHostFragment to Activity Layout
<!-- activity_main.xml -->
<androidx.fragment.app.FragmentContainerView
    android:id="@+id/nav_host_fragment"
    android:name="androidx.navigation.fragment.NavHostFragment"
    android:layout_width="match_parent"
    android:layout_height="match_parent"
    app:defaultNavHost="true"
    app:navGraph="@navigation/nav_graph" />
Navigate Between Fragments
// In HomeFragment — navigate to DetailFragment
binding.btnOpenDetail.setOnClickListener {
    // Using safe args or action ID
    findNavController().navigate(R.id.action_home_to_detail)
}

// Navigate with data
binding.btnOpenDetail.setOnClickListener {
    val action = HomeFragmentDirections.actionHomeToDetail(itemId = 42)
    findNavController().navigate(action)
}
// In DetailFragment — receive the argument
class DetailFragment : Fragment() {

    // Safe Args generates this — type-safe argument access
    private val args: DetailFragmentArgs by navArgs()

    override fun onViewCreated(view: View, savedInstanceState: Bundle?) {
        super.onViewCreated(view, savedInstanceState)
        val itemId = args.itemId  // Int, type-safe
        binding.tvItemId.text = "Item: $itemId"
    }
}
5. Manual Fragment Transactions (FragmentManager)
If you're not using Navigation Component, you can still manage Fragments manually. This is useful for simple cases or existing projects:
// In MainActivity.kt — load a Fragment into a container
class MainActivity : AppCompatActivity() {

    private lateinit var binding: ActivityMainBinding

    override fun onCreate(savedInstanceState: Bundle?) {
        super.onCreate(savedInstanceState)
        binding = ActivityMainBinding.inflate(layoutInflater)
        setContentView(binding.root)

        // Only load on first create — not after rotation
        if (savedInstanceState == null) {
            supportFragmentManager.beginTransaction()
                .replace(R.id.fragment_container, HomeFragment())
                .commit()
        }
    }

    // Helper to navigate to another Fragment and add to back stack
    fun navigateTo(fragment: Fragment) {
        supportFragmentManager.beginTransaction()
            .replace(R.id.fragment_container, fragment)
            .addToBackStack(null)  // User can press back to return
            .commit()
    }
}
onCreate(). Without this check, rotating the screen creates a new Fragment on top of the restored one — giving you a duplicate.
6. Fragment-to-Fragment Communication
Fragments should not communicate directly with each other — this creates tight coupling. The recommended pattern is to share data via a shared ViewModel scoped to the Activity — we cover ViewModel fully in ViewModel State Management:
// Shared ViewModel — scoped to the Activity
class SharedViewModel : ViewModel() {
    private val _selectedItem = MutableLiveData<String>()
    val selectedItem: LiveData<String> = _selectedItem

    fun selectItem(item: String) {
        _selectedItem.value = item
    }
}
// ListFragment — sends selection to ViewModel
class ListFragment : Fragment() {

    // activityViewModels() — scoped to host Activity, shared with other fragments
    private val sharedViewModel: SharedViewModel by activityViewModels()

    override fun onViewCreated(view: View, savedInstanceState: Bundle?) {
        super.onViewCreated(view, savedInstanceState)

        binding.btnSelectItem.setOnClickListener {
            sharedViewModel.selectItem("Kotlin Coroutines")
        }
    }
}
// DetailFragment — receives selection from ViewModel
class DetailFragment : Fragment() {

    private val sharedViewModel: SharedViewModel by activityViewModels()

    override fun onViewCreated(view: View, savedInstanceState: Bundle?) {
        super.onViewCreated(view, savedInstanceState)

        // Observe using viewLifecycleOwner — NOT 'this'
        sharedViewModel.selectedItem.observe(viewLifecycleOwner) { item ->
            binding.tvSelectedItem.text = item
        }
    }
}
viewLifecycleOwner — not this when observing LiveData in a Fragment. Using this (the Fragment) as the lifecycle owner means the observer stays active even after the view is destroyed, causing multiple observers to stack up every time the Fragment recreates its view.
Try It Yourself
- Build a two-Fragment app — create
HomeFragmentwith a button andDetailFragmentwith a TextView. Navigate between them using Navigation Component. Press back from Detail and verify it returns to Home. - Pass data to a Fragment — add a text input to
HomeFragment, pass the entered text as a navigation argument toDetailFragment, and display it there. - Find the memory leak — remove
_binding = nullfromonDestroyView(), enable LeakCanary (adddebugImplementation "com.squareup.leakcanary:leakcanary-android:2.12"), navigate between fragments, and observe the leak notification.
Frequently Asked Questions
What is the difference between a Fragment and an Activity?
An Activity is an independent screen. A Fragment must be hosted inside an Activity. Fragments are reusable, can be swapped dynamically, and adapt to different screen sizes — making them the building block of modern Android navigation.
Why do I need to null the binding in onDestroyView?
A Fragment can outlive its View (e.g. on the back stack). The binding holds a reference to the View — without nulling it, the Fragment in memory holds a dead View — that's a memory leak. Always _binding = null in onDestroyView().
How do Fragments communicate with each other?
Via a shared ViewModel scoped to the host Activity using by activityViewModels(). One Fragment writes data, the other observes. Always use viewLifecycleOwner — not this — when observing in a Fragment.
What is the Navigation Component?
A Jetpack library that manages Fragment navigation, back stack, and argument passing via a visual nav graph. Use findNavController().navigate(actionId) to navigate. Much safer than manual FragmentManager transactions.
- ← Step 4: Android Intents — Navigate Between Screens and Share Data
- Series Hub: Learn Android with Kotlin — Full Roadmap
- Step 6: Mastering RecyclerView — Efficient List Rendering →
- Related: Android BottomNavigationView with Navigation Component
- Related: ViewModel State Management — LiveData, StateFlow and SavedStateHandle
- Related: Kotlin Coroutines for Android — Suspend Functions, Scopes and Dispatchers
- Fragment — reusable UI piece always hosted inside an Activity
- Set up UI in
onViewCreated()— notonCreateView() - Always
_binding = nullinonDestroyView()— prevents memory leak - Use
viewLifecycleOwnerfor LiveData observers — notthis - Navigation Component — declarative nav graph, no manual back stack management
- Fragment communication — via shared ViewModel with
activityViewModels() - Check
savedInstanceState == nullbefore loading Fragment inonCreate() - Safe Args — type-safe argument passing via nav graph
<argument>tags