How to add BottomNavigationView into your Android App
Bottom navigation bars offer a persistent and convenient way to switch between primary destinations in an app it makes it easy to explore and switch between top-level views in a single tap.
Bottom navigation bars display three to five destinations at the bottom of a
screen. Each destination is represented by an icon and an optional text label.
When a bottom navigation icon is tapped, the user is taken to the top-level
navigation destination associated with that icon. Top-level views can contain Lists, Maps, Forms, etc.
Bottom navigation should be used for:
- Top-level destinations that need to be accessible from anywhere in the app
- Three to five destinations
- Mobile or tablet only
Bottom navigation shouldn’t be used for:
- Single tasks, such as viewing a single email
- User preferences or settings
Let's start with Adding BottomNavigationView to the application
The first thing we should do is add dependencies to our app level
build.gradle file.
dependencies {
    ...
    implementation 'com.android.support:design:28.0.0'
    ...
}
As the next step, Declare BottomNavigationView inside your
layout.xml file.
<LinearLayout
    xmlns:android="http://schemas.android.com/apk/res/android"
    xmlns:app="http://schemas.android.com/apk/res-auto"
    android:layout_width="match_parent"
    android:layout_height="wrap_content">
  ...
  <android.support.design.widget.BottomNavigationView
      android:id="@+id/bottom_navigation"
      android:layout_width="match_parent"
      android:layout_height="wrap_content"
      app:menu="@menu/bottom_navigation_menu" />
</LinearLayout>
Declare navigation items into a file named
bottom_navigation_menu.xml inside a menu resource directory:
<menu xmlns:android="http://schemas.android.com/apk/res/android">
    <item
    	android:id="@+id/recents"
    	android:title="Recents"
        android:icon="@drawable/ic_history_24dp"/>
    <item
        android:id="@+id/favorites"
        android:title="Favorites"
        android:icon="@drawable/ic_favorite_24dp"/>
    <item
        android:id="@+id/nearby"
        android:title="Nearby"
        android:icon="@drawable/ic_place_24dp"/>
</menu>
Add the
OnNavigationItemSelectedListener in your class file.
BottomNavigationView bottomNavigationView;
// ...
bottomNavigationView.setOnNavigationItemSelectedListener(new OnNavigationItemSelectedListener() {
     @Override
     public boolean onNavigationItemSelected(@NonNull MenuItem item) {
         if (item.getItemId() == R.id.favorites) {
             // on favorites clicked
             return true;
         }
         return false;
     }
});
Try the below code if you want to select items programmatically
BottomNavigationView navigationView;
// ...
navigationView= (BottomNavigationView) findViewById(R.id.bottom_navigation);
navigationView.getMenu().getItem(itemToSelect).setChecked(true);
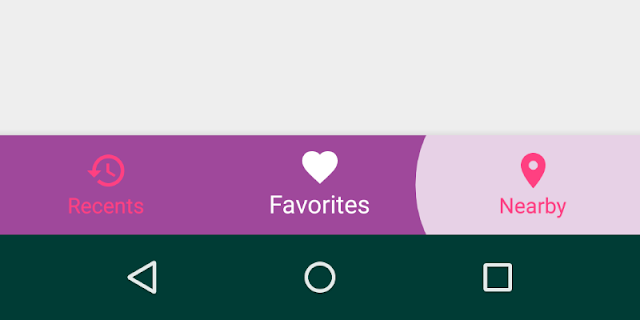
The result should look like this
Adding style to BottomNavigationView
Create a selector file named
navigation_bar_txt_color.xml under the color resource directory and define the customized colors for navigation items.
<selector xmlns:android="http://schemas.android.com/apk/res/android">
    <item android:state_checked="false" android:color="@color/pink"/>
    <item android:color="@android:color/white"/>
</selector>
Create a selector file named
navigation_bar_item_bg.xml under the drawable resource directory and define customized backgrounds for navigation
bar items.
// res/drawable, to support devices lower then 21 API
<selector xmlns:android="http://schemas.android.com/apk/res/android">
    <item android:state_pressed="true" android:drawable="@android:color/white"/>
    <item android:drawable="@android:color/transparent"/>
</selector>

// res/drawable-v21 folder, for devices greater or equal then 21 API
<ripple xmlns:android="http://schemas.android.com/apk/res/android"
        android:color="@android:color/white">
</ripple>
Now, Create a new style under
res/values/styles.xml and add
properties to it.
<style name="BottomNavigation">
    <item name="android:background">@color/indigo</item>
    <item name="itemBackground">@drawable/navigation_bar_item_bg</item>
    <item name="itemIconTint">@color/navigation_bar_txt_color</item>
    <item name="itemTextColor">@color/navigation_bar_txt_color</item>
    <item name="paddingStart">@dimen/bottom_navigation_padding</item>
    <item name="paddingEnd">@dimen/bottom_navigation_padding</item>
</style>
Now add this style to your
BottomNavigationView by using style
property.
<android.support.design.widget.BottomNavigationView
    ...
    style="@style/BottomNavigation"/>
The result should look like this
References :


